Advanced JSON Workflow
What You Will Build
This guide does not attempt to cover every possible template or workflow combination. Instead, it introduces a simple pattern that you can reuse and extend.
We will build a workflow with three components:
- Data source — Google Sheets
- Eledo — PDF generation
- Data sink — Google Drive (stores generated PDFs)
Once you understand this pattern, you can adapt it to other data sources and storage systems supported by n8n. In this guide, we will look at complex templates and the JSON input mode.
When to Use JSON Mode
JSON mode is intended for advanced users. If you are working with simple templates, read the Guided Fields documentation first.
JSON mode gives you full control over the data sent to Eledo. Instead of filling fields through the UI groups, you provide a complete JSON payload that matches your template structure.
As long as the JSON is valid and matches your template, the document will be generated.
Use JSON mode when:
- Your template contains nested objects
- Your template contains repeatable groups (arrays)
- You need full structural control
- Guided Fields do not expose all required attributes
JSON mode supports the entire template structure without limitations imposed by the UI.
Step 1 — Create a Complex Template in Eledo
For this guide, we will use a complex template with nested fields.
Instead of creating a template from scratch, we recommend selecting one from the public template library and modifying it. This allows you to get started quickly.
If you prefer to create a template from scratch, refer to: Template Editor
Instructions
- Log into your Eledo account.
- Open My Templates.
- Click From Library to access the public template catalog.
- Select a template and click Try it out. This creates a private copy under your account.
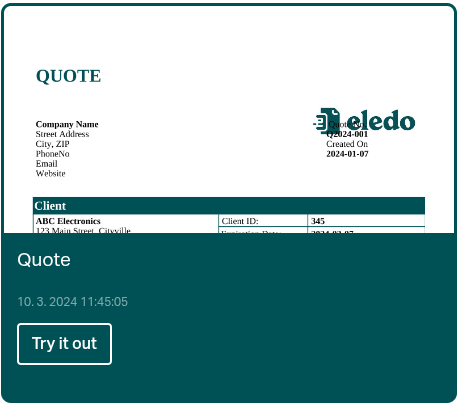
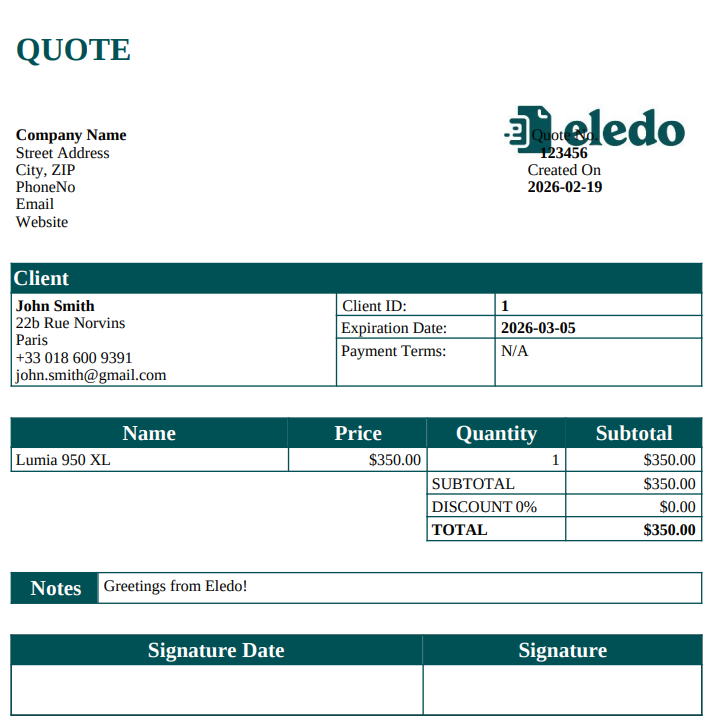
- For this guide, select Quote.
You can freely modify your private copy.
Step 2 — Design your data binding to match the JSON data structure
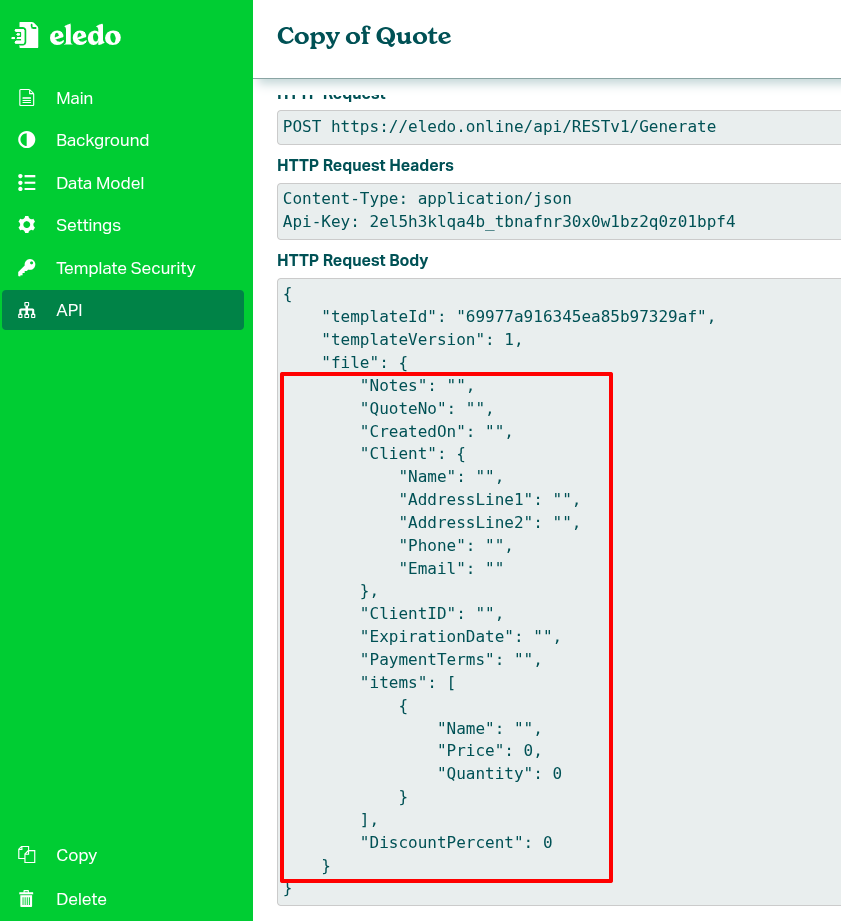
In the left-side drawer menu, click on API. You will see the full template data model. Review the payload inside HTTP Request Body carefully.
This is the design phase — you must decide:
- which fields will be populated dynamically from external data sources,
- which fields will remain static (prepopulated with constant values),
- and which fields will remain unpopulated.
You are not obliged to fill every field. Eledo can generate documents even with partial data.
Since this is a guide, we will do the design decisions together.
We will define two clients to fill in this part of the JSON payload:
...
        "Client": {
            "Name": "",
            "AddressLine1": "",
            "AddressLine2": "",
            "Phone": "",
            "Email": ""
        },
        "ClientID": "",
...
In a real scenario, you would likely bind items to a real data source as well:
        "items": [
            {
                "Name": "",
                "Price": 0,
                "Quantity": 0
            }
        ],
And there are other attributes worth mapping to dynamic data sources. For demonstration purposes, only client data will be fetched dynamically, while the remaining fields will remain constant.
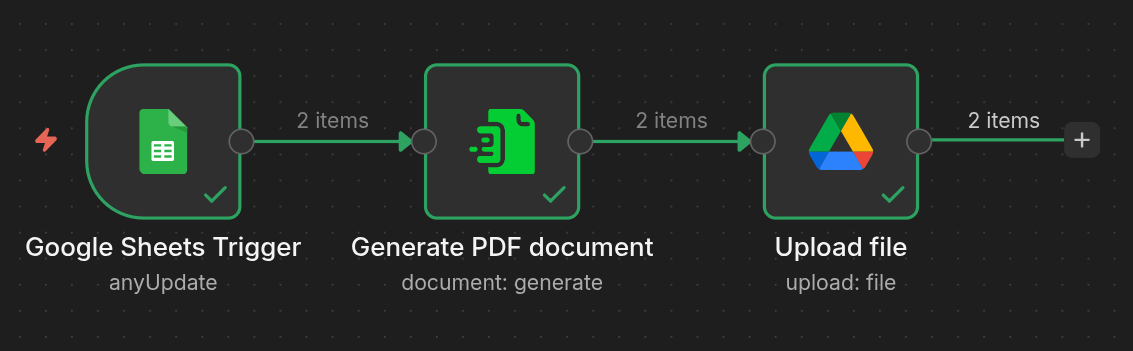
Step 3 — Create the n8n Workflow
Create a new workflow in n8n and add three nodes:
- Google Sheets (data source)
- Eledo
- Google Drive (storage)
Configuration of Google Sheets and Google Drive nodes is outside the scope of this guide. Follow the official n8n documentation for authentication and basic setup.
Google Sheets Configuration
Create a Google Sheet with the following structure:
| clientName | clientId | clientAddress1 | clientAddress2 | clientPhone | clientEmail |
|---|---|---|---|---|---|
| John Smith | 1 | 22b Rue Norvins | Paris | +33 018 600 9391 | john.smith@gmail.com |
| Peter File | 2 | 69 Crown Street | London | +44 078 4329 4446 | file.peter@gmail.com |
| Valentina Rossi | 3 | Via Venezia 133 | Rome | +39 032 1663 0247 | bluevelvet76@gmail.com |
Each row represents one unique person.

Set up a trigger so that the workflow runs when a row is added or updated.
The first row must contain headers. n8n automatically uses these headers (clientName, clientId, ...) as property names.
In the Google Sheets node:
- Authenticate
- Select the correct document
- Select the appropriate sheet
In this example, we selected a document named Eledo demo.
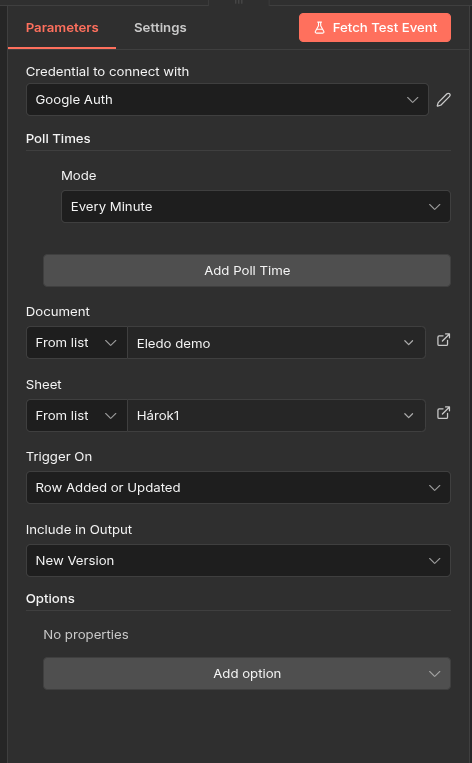
When you're done configuring, click on Fetch Test Event. This will fetch your data and make it visible inside the Eledo node.
Eledo Node
Add the Eledo node and connect it between Google Sheets and Google Drive.
We will configure it in the next steps.
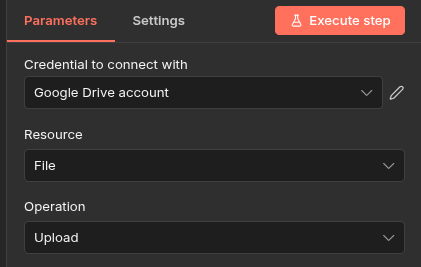
Google Drive Configuration
Create a folder in Google Drive where generated PDFs will be stored.
In the Google Drive node:
- Authenticate
- Select Upload file action
- Choose the target folder
Step 4 — Configure Authentication
Open the Eledo node configuration.
Before it can be used, credentials must be created.
Follow the Authentication documentation to configure your API key.
Step 5 — Select a Template
In the Eledo node:
- Set Template Scope to
Private - Select your copied template (for example:
Copy of Quote (v1))
About Template Scope
- Private scope contains your templates and copies of public templates.
- Public scope allows direct use of public templates.
By default, Eledo uses the latest version of the selected template. You may optionally lock a specific version.
Template names and version numbers may differ slightly. This is expected.
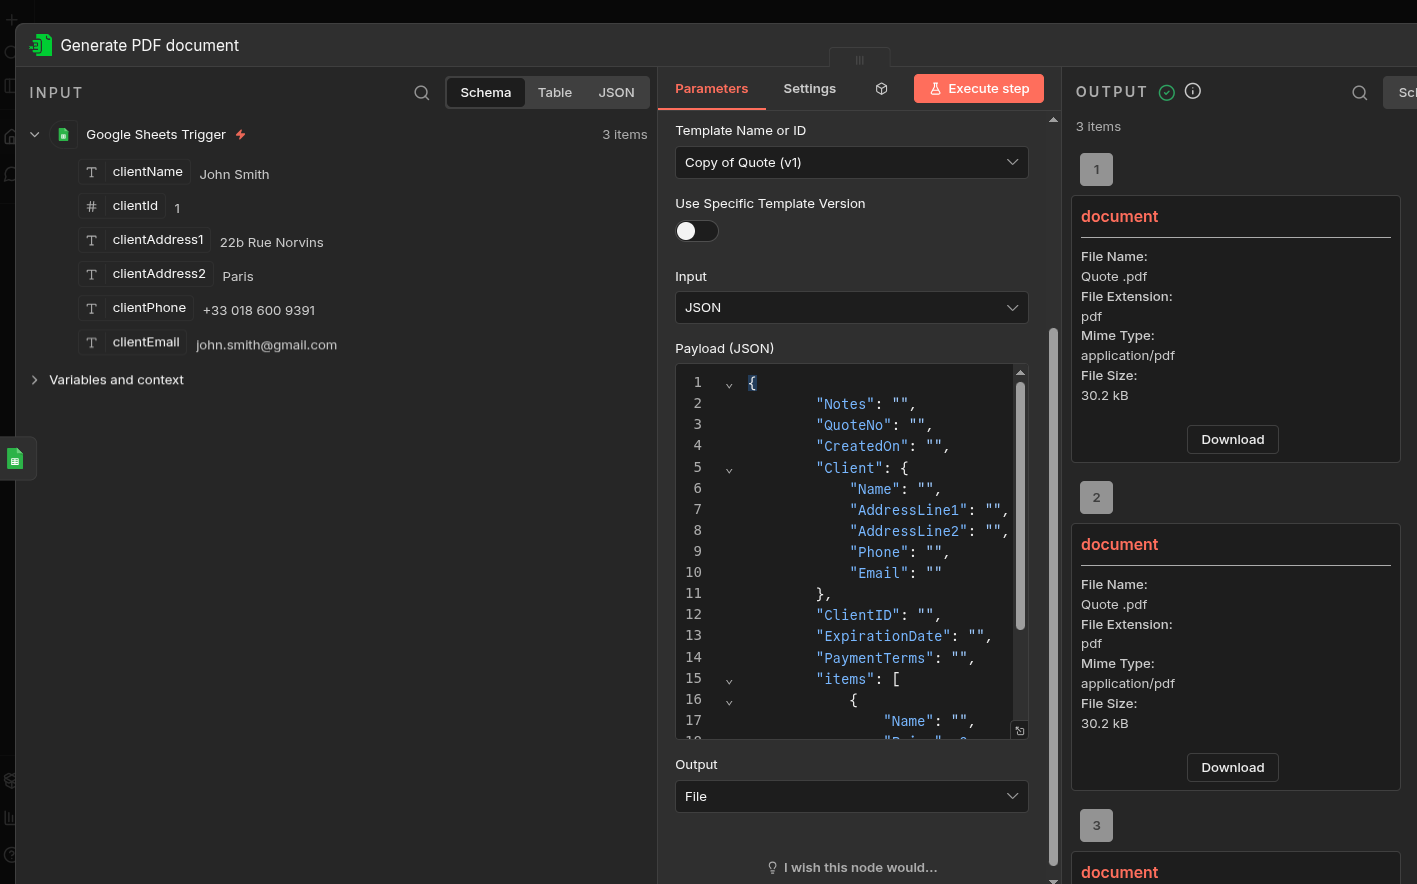
Step 6 — Bind Data Using JSON
In Step 2 we have looked at full template data structure. Now it is time to return to that page and copy the JSON payload.
Get empty JSON payload
- Log into your Eledo account (if you're not already logged in).
- Open My Templates.
- Select Copy of Quote template.
- In the left-side drawer menu click on
API
We're interested in the HTTP Request Body section. But not the whole section. What you need to copy is the JSON object assigned to the "file" key — this is our payload.
{
    "Notes": "",
    "QuoteNo": "",
    "CreatedOn": "",
    "Client": {
        "Name": "",
        "AddressLine1": "",
        "AddressLine2": "",
        "Phone": "",
        "Email": ""
    },
    "ClientID": "",
    "ExpirationDate": "",
    "PaymentTerms": "",
    "items": [
        {
            "Name": "",
            "Price": 0,
            "Quantity": 0
        }
    ],
    "DiscountPercent": 0
}
Configure JSON Payload
- In n8n, go back to your Eledo node configuration
- Change input from
Guided FieldstoJSON - Paste your empty JSON from the prior step into
Payload (JSON)
At this stage, when you click Execute step, Eledo will already generate a PDF — but it will contain no real data.
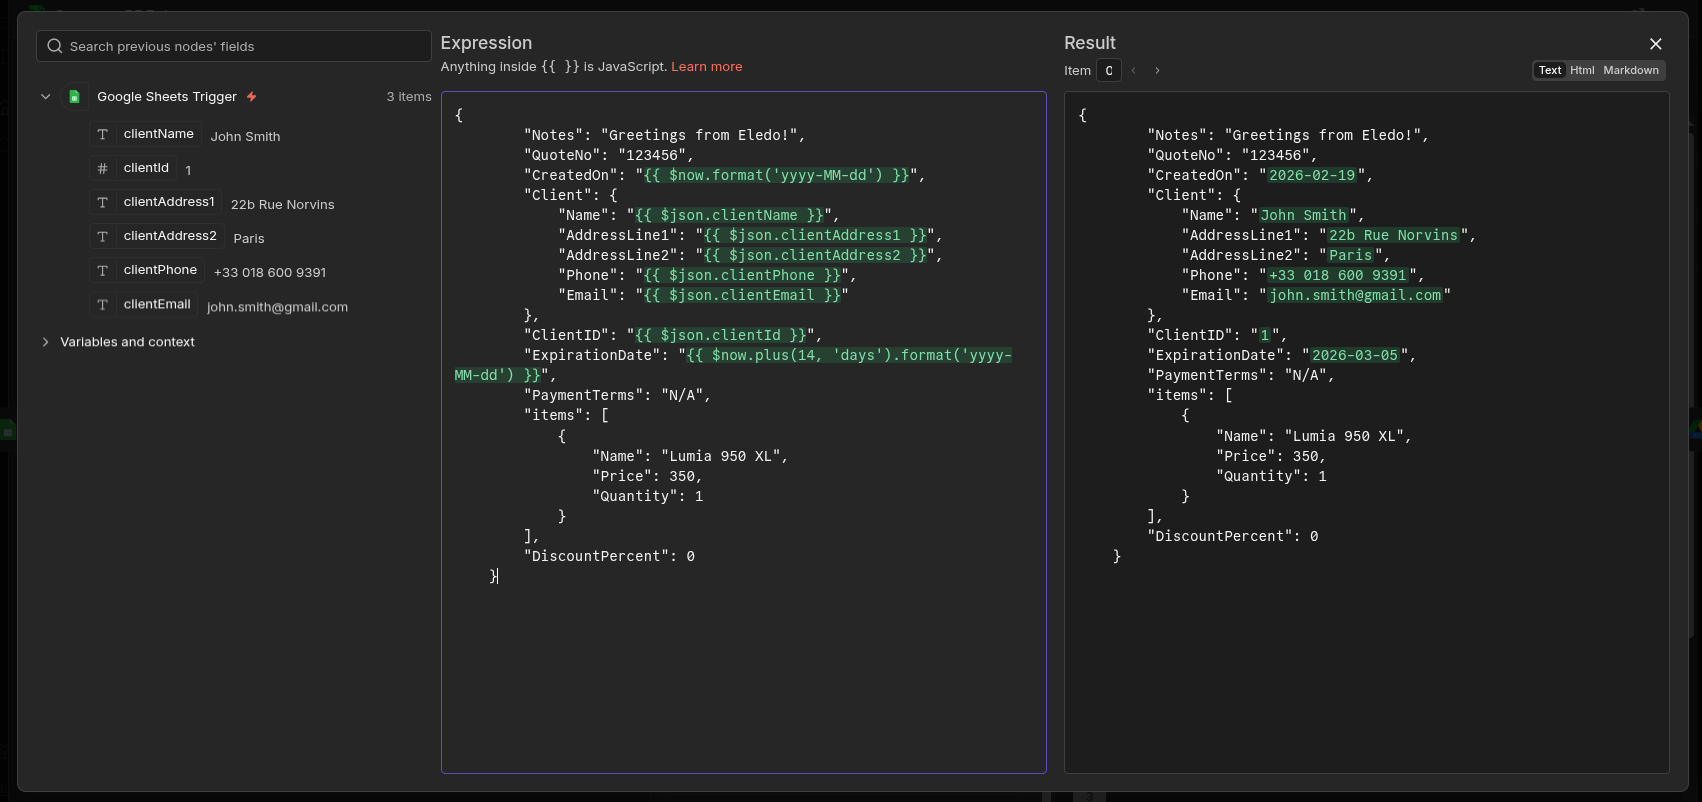
Bind dynamic data and finish the configuration
While you can edit the JSON payload directly in the main configuration dialog, we strongly recommend clicking the small expansion icon below the text box.
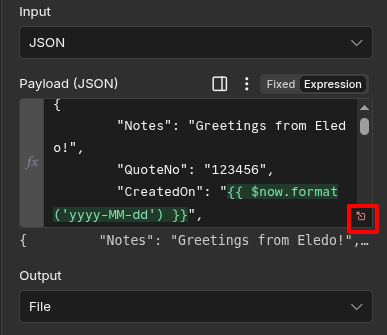
You will see a dedicated window where you can conveniently map all dynamic entries, or set up some static text. Have a look at our example below.
Step 7 — Test the Workflow
Click Execute step in the Eledo node.
If everything is configured correctly, you should see a generated PDF for each client in your sheet.
Download and verify the results.
Step 8 — Upload PDFs to Google Drive
Now configure the Google Drive node to store the generated files.
Prerequisites:
- Authentication configured
- Target folder selected
Inside the Google Drive node:
-
Set Operation to
Upload -
Switch the required fields to Expression mode
-
Map:
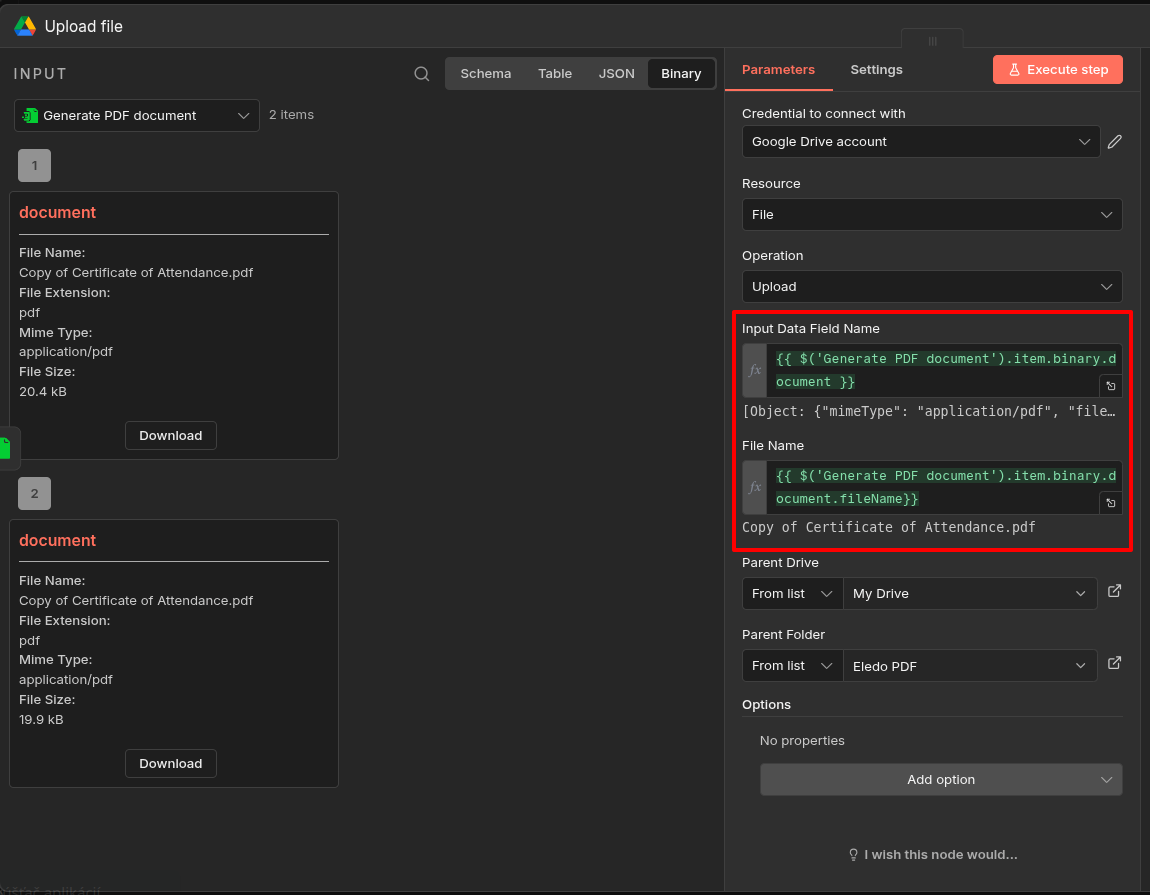
- Input Data Field Name →
{{ $('Generate PDF document').item.binary.document }} - File Name →
{{ $('Generate PDF document').item.binary.document.fileName }}(optional)
- Input Data Field Name →
This tells Google Drive to upload the PDF file generated by the Eledo node.
See the screenshot below for exact expression examples.
What’s Next?
You now have a working automation:
Google Sheets → Eledo → Google Drive
From here, you can:
- Add more rows to your sheet and observe automatic document generation
- Replace Google Sheets or Google Drive with other integrations
- Change output from
FiletoBase64
The pattern remains the same.
Addendum: Handling Output
By default we output binary data exactly as received from Eledo. You might change this to get a Base64 string representation. Please read our Output Modes document.
Addendum: Version Pinning (Optional Advanced Tip)
n8n allows you to install a specific version of the Eledo node. This feature is called version pinning and can be useful when you want to lock your Eledo node to a specific version while testing newer releases in a separate sandbox environment. Please refer to our Installation document for more details.